
Color Management Series
Color Management in Octane
Version 1.2, Updated January 2024 using C4D 2024.1, Octane 2023.1-[R6] and help from Karl Hendrikse at Otoy (thank you!!)
About This Guide
This is the second guide in the Color Management series. It mainly covers how Octane handles color management. This guide was built using the Cinema 4D plugin, but the settings and concepts apply to Standalone and any of the plugins.
It assumes you’ve read (or at least skimmed) the first guide in the series: Color Spaces Overview and have a pretty good understanding of what makes up a color space and the theory behind it.
Part I is a quick refresher of what we learned in the first guide in this series.
Part II goes into how color management works in Octane.
Part III takes a look at a few common color management workflows.PDF
Part I: Quick Refresher
This is a high level summary of our findings in the first guide of this series.
Digital color management is done largely through color spaces. A color space must describe three things:
1. A gamut (a set of all colors it can reproduce)
2. A white point (a constant fixed color in the gamut agreed upon to be “white”)
3. A transfer function which describes how the data is stored and provides a method of converting from/to physically linear values.
Typically, pro apps work in a working color space, the hallmarks of which are a linear transfer function and high bit depth. These are great for color/light calculations and simulating reality, but produce big, unwieldy files that contain more data that we can actually see, so they’re used as “source” files rather than final distribution files.
Displays utilize display color spaces which have a smaller gamut, nonlinear transfer function, lower bit depth, and are precise enough so images look good to our eyes, but not much more than that. Files are small and easy to store and stream to the devices meant to display them, but most of the original data is lost, so editing these files in post can be challenging and limited.
When we’re working with our creation tools, we use what’s called a linear workflow. This takes external files created in a display space, uses that display space’s transfer function to convert them to physically linear values so our working spaces can operate on them. We then see a preview of the result using our target display space, and eventually export files in either a full fidelity working space meant to be further edited in another tool or for archiving/storage, or reduced in size/gamut, and saved in a display space meant to be consumed on a particular class of devices (phone/PC, TV, movie screen, etc.).
Exporting files that use working color spaces is easy enough - they are usually stored as linear 32-bit or 16-bit floating point EXR files without much or any loss of data. There are a few decisions to be made concerning compression and whether 32-bit is really needed for particular passes, but for the most part, we’re just trying to preserve as much data as possible at the expense of file size.
Exporting files to lower bit depth display space files is a whole other matter. Most of the data produced in the working space calculations has to be trashed to fit in an 8-bit PNG, or even in 10- or 12-bit files for HDR TVs and the like. This is a two-part process.
The first part is tone mapping which takes wide-gamut values and reduces them to fit in small gamut display spaces. There are a lot of ways to achieve this, each with pros and cons. The second part uses a nonlinear transfer function which optimizes the reduced data in a way that plays nicely with what our eyes and brains care about (shadows over highlights).
So serious right now - if any of this didn’t make sense, review the first guide in this series: Color Spaces Overview. All of the concepts above are crucial to understanding how Octane (or any other engine or app) handles color management.
👉 Octane and Cinema 4D handle color management mostly independently. 👈
This is an important concept to grasp, and a very different mindset to be in if we’re coming from another engine like Redshift or Standard/Physical because it means that for the most part, any color settings we change in C4D itself won’t affect the look of Octane’s renders in the Live Viewer or direct export. There are a few instances where one needs color data from the other, but in the grand scheme of things, if we’re using Octane, we’ll be doing our color management in Octane.
The second important thing to know up front is that the Live Viewer is (as of this writing) only capable of displaying 8-bit values. Octane itself is capable of rendering and exporting higher bit depth/wider gamut images in any color space, but while we’re working and previewing in the Live Viewer, we’re only going to be seeing the representation of our renders in 8-bit sRGB, regardless of the color space set or what our monitors can handle.
Overview
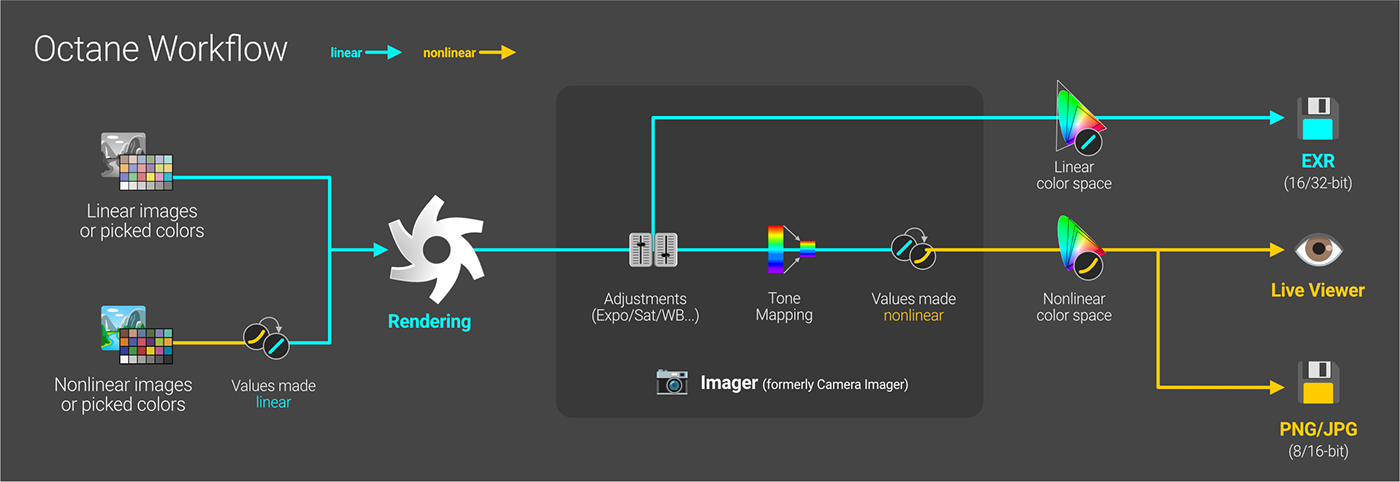
Octane’s render engine calculates and renders physically linear values. Any imported textures or colors need to be conformed to values Octane can work with.
Individual colors can be picked either via a linear or nonlinear color model (nonlinear is usually preferred). Non-linear colors are converted to linear values prior to rendering. External images need to have their color spaces specified so Octane can properly convert them and work with them.
After rendering, the data is further processed by the Imager (formerly Camera Imager), either in the global Octane settings or overridden by a particular camera in the scene in the Octane Camera Tag.
The Imager contains settings like White Balance, Saturation, Exposure, and a few others that bake into the color data itself and will alter the colors even if we export high bit depth EXR files with linear color spaces.
Most of the rest of the Imager settings are lumped into Tone Mapping which is the process of taking wide-gamut data and converting it down into values that our nonlinear display space PNGs and JPEGs can use.
The low bit depth data is then saved in formats like PNG/JPG using a nonlinear display color space or viewed in the Live Viewer.
Let’s have a look at each part of this process in a little more depth:
Octane's "Working Space"
Octane is what’s known as a spectral render engine, meaning it doesn’t have a Working Color Space as we’ve come to understand it. Weird, right? Turns out this is a good thing.
Instead of using a gamut and white point and transfer function, Octane directly calculates the physical properties of light spectra (hence ‘spectral’ render engine). This is part of what gives Octane its beautiful, realistic, signature look. To us, it still feels like a Working Space, but under the hood it works differently. We can’t just save a PNG or EXR with an “Octane color space” like we can with Linear sRGB or ACES because there simply isn’t one, but since Octane’s calculations cover the entirety of the visible spectrum, we can convert the rendered data to any color space, working or target, and export files using the appropriate one.
External Images
There are two things to keep in mind when bringing in external files:
1. ALWAYS use the ImageTexture node - NEVER use C4D’s bitmap shader
2. Always change the ImageTexture’s Color Space dropdown to the correct color space for the image.
ImageTexture Node
There are a few ways to import external files in Octane for C4D. If we’re using the node editor, we can just drop them in the editor from the Finder or Explorer and it’ll make a new ImageTexture for us that links to the file. We can also create an ImageTexture node from scratch, and it will pop up a box asking where the image is. If we’re using the Node Editor, we’re pretty safe because all images are handled through ImageTexture nodes.

The problem lies in using the Material Manager. If we were to just go to, say, the Diffuse channel, and click the long bar (or folder icon) next to “Texture” and pick a PNG file, it will house it in a C4D Bitmap shader. DO. NOT. DO. THIS. The Bitmap shader is missing a lot of features that make images work properly in Octane.
If we’re using the Material manager, we want to make sure we hit the little arrow-dropdown thing next to Texture (not the long bar), go into c4doctane, and pick ImageTexture. Then click into where it says ImageTexture and select the PNG or EXR or whatever that way. It’s honestly just easier to use the node editor if we’re working with external images.
This is a C4D-specific issue - it doesn’t come into play in Standalone. Depending on how the other DCCs handle external files, similar steps may have to be taken to ensure the ImageTexture node is always being used.
Color Space Dropdown
Once the Texture is in its nice, cozy ImageTexture node, and NOT in the awful, hateful, very bad C4D Bitmap shader, we need to make sure the settings are right.
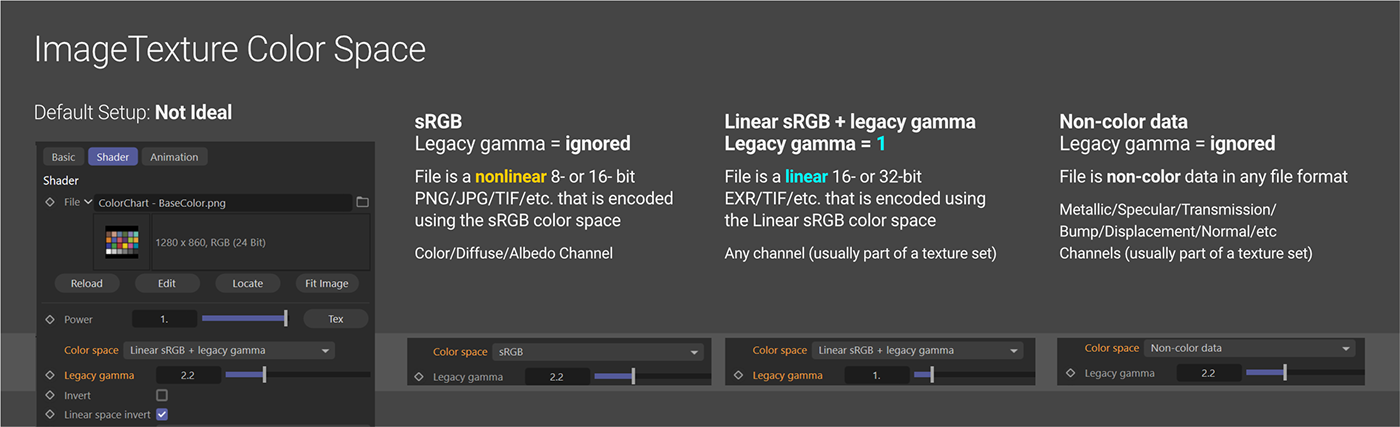
As of this writing, by default, the Color space dropdown in the ImageTexture node is set to Linear sRGB + Legacy Gamma, and the gamma is set to 2.2. This combination of attributes is actually rarely found in the wild, so we’re always going to need to change something here if we want our colors to be as accurate as possible.
Textures meant for color channels
If our external texture file is meant to be used in the color/diffuse/albedo channel (or other channels that use color data like Transmission), the odds are really good that it’s an 8-bit PNG or JPEG in the sRGB color space. We want to make sure that the dropdown is set to sRGB instead of the default “linear sRGB with legacy gamma”. As we learned in the last guide, a true 2.2 gamma curve will come close, but won’t be the exact transfer function used for sRGB. When we change this to sRGB, Octane will use the true sRGB transfer function instead of gamma and will ensure that the colors are converted from the image properly.
Now, if our external texture file is a 16- or 32-bit EXR or TIFF saved in the Linear sRGB color space, THAT’s when we should use the default Linear sRGB + Legacy Gamma setting, but we need to make sure the gamma is set to 1. That will interpret the data as linear, and it will convert properly.
There are other color space options as well in case we have files that we know were saved as ACES or something else via OCIO.
Textures meant for non-color channels
If the file is a utility texture map generated by a program like Substance, meant to be used in any of the non-color channels (metallic/specular/bump/height/normal/etc.), we want to make sure we tell Octane that it’s non-color data so it can parse it correctly. This will ensure that our bump heights, normal calculations, and roughness amounts appear as intended. While normal maps may LOOK like color data when viewed in an image editor, they’re really not - the coloring is only used as a way to split out sets of raw numbers so the engine knows how light bounces off the surface of the object it’s applied to. Normal maps need to be set to non-color data.
Once anything other than Linear sRGB + Legacy Gamma is chosen, the Legacy Gamma setting won’t do anything anymore, so it doesn’t matter what value is in there at that point. For all practical purposes, the only time to use this is when it’s set to 1 and we’re using a linear sRGB TIFF or EXR image.
Picking Colors
Important: No matter what we do, our colors are going to shift during render if we’re using ACES or OCIO tone mapping. We’ll look more into this later, but it’s just a good thing to know up front.
When we’re picking a color for the color channel of a material (sometimes called “Color” sometimes “Albedo”, sometimes “Diffuse” depending on the material type), or one of the other channels that use color data like Transmission, we usually want to use a nonlinear color picker. This is what our eyes expect to see once the render is complete. Linear values tend to appear “washed out” because of all the biology and technology stuff we learned in the previous guide, so it’s best to pick color values as we want to see them - nonlinearly!
When we’re choosing a value for a non-color channel of a material like Bump, Displacement, Metallic, etc, we want to use a 0-1 linear scale. What we’re expecting here is that if we pick a 25% gray (0.25), that our bump only goes 25% of the way up, or our specular strength is exactly 25%. If we change it to 75% (0.75), the bump should now go up 75% of the way, or the specular strength is now 75%. If we’re using a linear color model, then this is exactly what happens - awesome.
If we use nonlinear values when Octane is expecting linear ones,, everything shifts along the sRGB transfer function curve and suddenly the 50% we picked now only pushes our bump up like 20-something%. If we’re picking values for non-color channels, it’s best to disregard how it looks to our eyes and give Octane the values it’s expecting - linear ones!
A Tale of Two Pickers
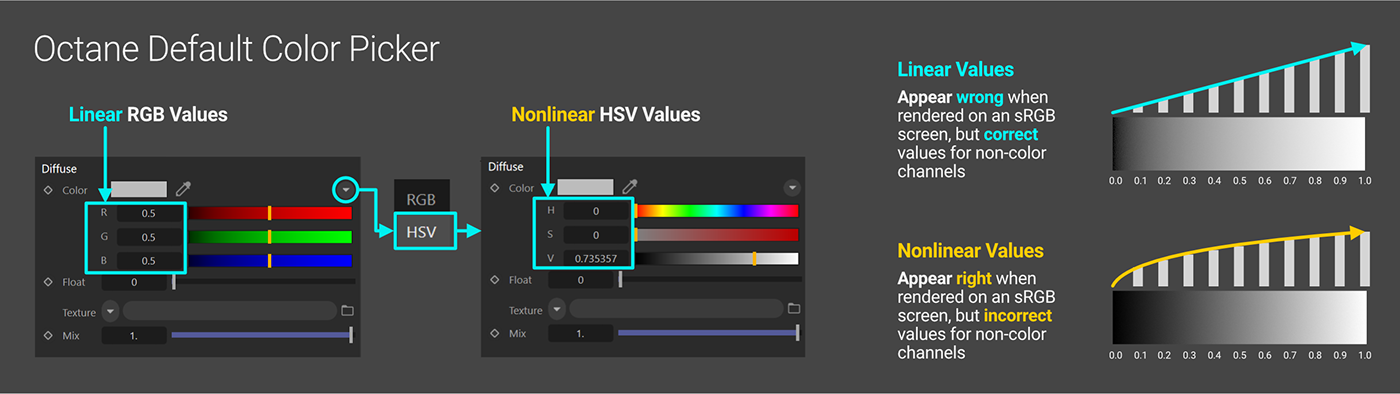
By default, Octane in C4D starts with the Octane-native color picker. This picker uses LINEAR R, G, and B values that go from 0-1, accurate out to five places after the decimal. This is fantastic if we want our metallic channel to have a value of 22.828%, but not so great if we want our surface to be a specific sRGB color that we already know.
In recent versions of the Octane plugin, we can now hit the little fly-out menu to the right in the color picker and choose HSV. This will give us a NONLINEAR picker using the HSV color model. This is better for picking sRGB values, but still not great if we’re used to other models from our 2D apps like Hex or 8-bit nonlinear RGB (0-255).
Octane gives us the option in Settings (gear menu in the Live Viewer) of choosing the C4D color picker. This gives us a number of other color models that produce nonlinear values. These are the models we’re used to like hex values, 8-bit sRGB sliders, swatches, and a few other rando ones like Kelvin or mixer. This is what we want when we’re picking Diffuse/Albedo/Color channel colors (or any other channel that uses color data).
We can turn on a few of these color models at once by shift-clicking their icons, which is pretty handy.
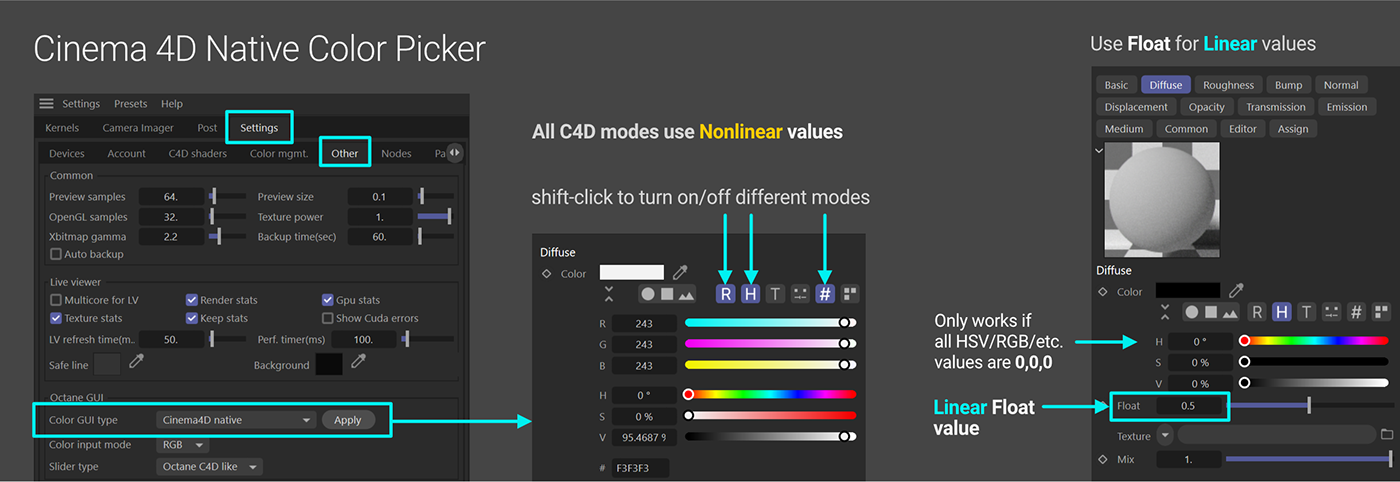
The problem here is that if we’re using the C4D color picker, there’s no linear option (this is a global color management option in C4D that’s cumbersome to swap back and forth). For that reason, we have the float slider in most of the material channels. This is a linear 0-1 scale that we can use to determine values for our non-color channels.
Important: If ANYTHING other than pure black (0,0,0) is selected in the color picker, it will override the float slider.
In cases like Texture Emission where there’s an intermediate node we need to use, we can use a FloatTexture node in the input rather than rgbspectrum in order to get linear values for our emission or displacement.
So now we have options to use both linear and nonlinear values depending on what channel we’re trying to affect.
Other color inputs
Various nodes in Octane either use linear or nonlinear values, depending on their intended use. As of this writing, there’s no true sRGB gradient node in Octane. There are a few linear ones, and the Gradient Generator uses a gamma curve, but that’s a little different (as we now fully understand thanks to it being beaten into our heads repeatedly in the last guide). In this case, it’s probably close enough for our needs since it’s just meant to look good and not be super precise.
There’s a Color Space Converter utility node that lets us change from linear sRGB to sRGB (called “perceptual” in the C4D plugin), so we can run a linear gradient through that if we need precise sRGB conversion.
When creating emission, we have two options - Texture Emission or Blackbody Emission.
Blackbody emission simulates real-world radiation from various light source types (incandescent/halogen/etc.) that we can set with a temperature (Kelvin) value. This gives us the color cast that comes naturally with that value: The higher the temperature of the light, the more of a bluish cast it takes on, and the lower the temperature, the more reddish the cast.
Texture emission takes texture inputs, so this works in RGB values (either linear or nonlinear).
Spectral values are used in the Octane Daylight object using any model other than Octane (Preetham, Nishita, and Hosek Wilkie as of this writing). The last place we can access spectral values is using an OSL texture with the _whiteLightSpectrum function.
The Imager
Once the render is done, it’s processed through Octane’s Imager where it’s tone mapped, edited, and converted to various color spaces so we can view or output our final files.
Tone Mapping
Octane can calculate and render the entire visible spectrum. Our sRGB monitors can’t display that, and the files we generate can’t contain all that for reasons we covered in the last guide.

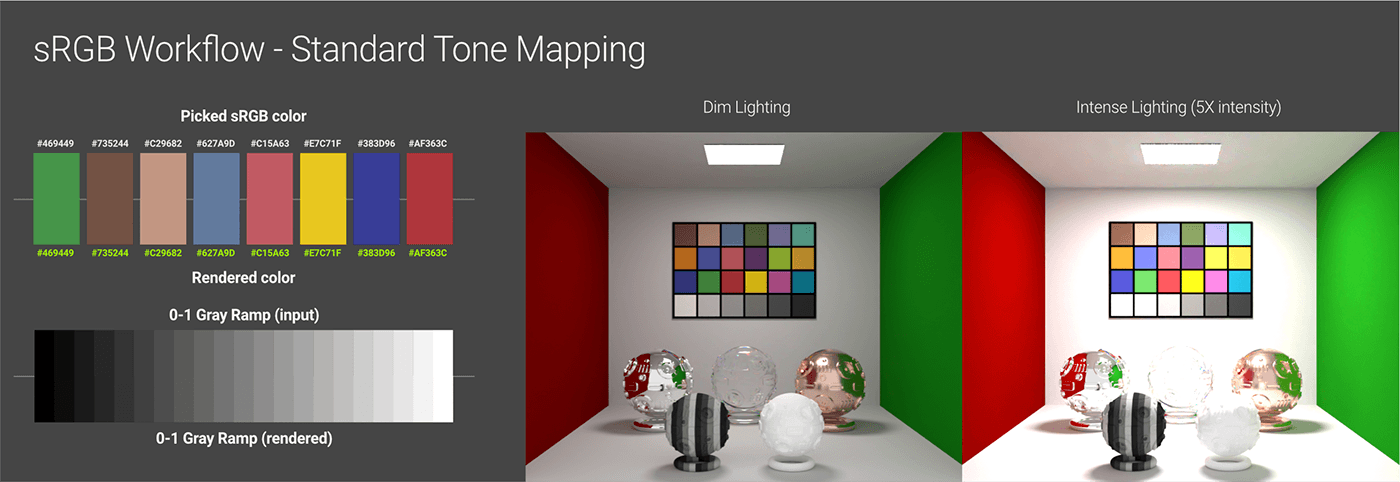
When we bring up the RGB, HSV, or other color model sliders to pick a particular orange, blue, shade of gray, or whatever else we’re after, these colors are all inside of the sRGB gamut. Octane’s Live Viewer is an 8-bit window, so we can really only choose colors in the sRGB gamut and reliably see what we’re doing even if our monitors have a wider gamut (DCI/Display P3 or Rec2020 for example).
When we alter the illumination of the scene and change up the properties of our materials, Octane calculates the effects of these things which will alter our colors. If we keep all our values realistic and don’t push the lights too hard, the values stay in the sRGB gamut and look fine when we view or export our final output at sRGB. If we raise the intensity of the lights or alter the materials too much in a way that - even if they’re realistic - still pushes the colors out of the sRGB gamut, we start to run into problems.
These values will still be calculated properly by Octane since it’s spectral and isn’t bothered by trivialities such as gamuts. They may well even be visible in some color spaces on higher bit depth displays, but when we go to view them in the 8-bit Live Viewer window or export to sRGB PNG, they need to be converted to something in the sRGB gamut, or else they just wouldn’t show at all.
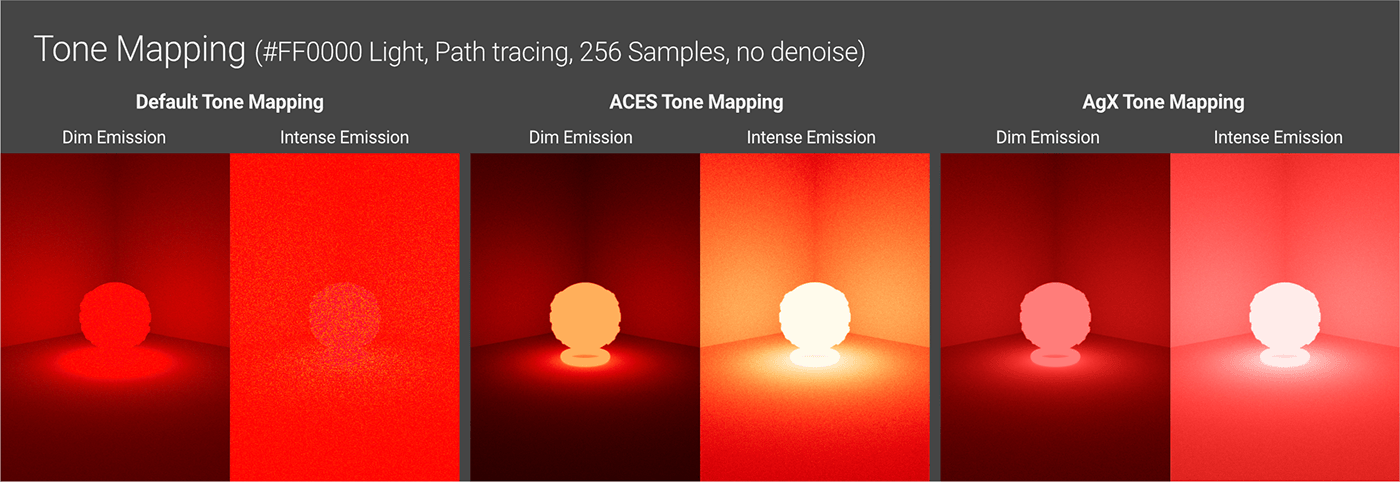
At this point, we have two options. First, we can choose to use the default tone mapping which just clips the values at the nearest point of the gamut. This will perfectly preserve our picked color and any calculated colors that are inside the sRGB gamut, but anything outside of it will shift in a way that may result in artifacts like blown highlights and other visual atrocities.
Our second option is to use something like ACES or AgX tone mapping. This will shift ALL the colors, regardless of whether they are inside the gamut or not. Everything will be further moved into the gamut in order to preserve the intention of what we were trying to do when we blasted our geo with a powerful light.
The downside is that ALL of the colors shift, including our original picked one. This makes things look more realistic and pleasing overall, but if it’s important that our picked colors are maintained exactly, it’ll probably be easiest to just alter the resulting image in post to counter this effect.
So when do we want to use what?
If we’re working on corporate explainers or other non-photoreal pieces where specific colors are extremely important, then we should consider default tone mapping and just be really careful about not doing anything to push our colors out of gamut. If we go this route, we also have some options for correcting problems or creatively altering the tone mapping using other settings in the Imager which we’ll look at soon.
One of the big downsides of default tone mapping is that the world isn’t sRGB. There are a lot of realistic values we could be using if we weren’t limited to such a small gamut. A different tone mapping scheme would allow us to work with those values, and then rather than just disregard the ones it doesn’t like, work with them to fit them into our limited sRGB parameters.
Since it’s not a perfect match, creative decisions have to be made as to HOW those values fit into our final results, and we have to be okay with the tradeoffs.
If we’re working on a project in the ACES pipeline, where the final output is going to use ACES tone mapping, we should use ACES tone mapping and adjust our values and workflow accordingly so things look good once that’s been applied. Fortunately with the single ACES tone mapping checkbox in the Imager, this is pretty easy to do. Similarly, if we’re part of a pipeline that includes some other type of tone mapping via OCIO, we should use that (we’ll get into how to set that up in the next section).
If our project is open-ended and we’re not concerned about matching footage from a particular camera, working within a larger org that has a specific pipeline, or keeping with our corporate brand colors, we can choose whatever tone mapping scheme that looks good to us. We might prefer the more ‘cinematic’ look ACES gives us, or we might think AgX gets us more realistic images (we’ll look at setting this up in the next section).
One of the great things about Octane being a spectral engine is that we can just try out a whole bunch of different tone mapping settings and never have to worry about the working space. We can even have different tone mapping per camera if we want.
Other Post Processing Stuff
Octane has several post processing settings that affect the render during different phases. it’s important to know which of these settings happen before, during, and after tone mapping so we know whether they’ll appear in our high bit depth EXRs, low bit depth PNGs, or both. These are found in the Post and Imager tabs either in the global Octane settings or in each Octane Camera Tag.
Settings in the Post Processing Tab

These are simulated lens effects like Bloom and Glare that mainly impact the look of the emission in a scene. These effects happen prior to the mapping process, so, for example, if we apply a ton of bloom to the image and most of it is washed out when using default tone mapping, but then apply ACES or AgX tone mapping, it will rein the values in so the final image isn’t blown out.
These settings affect both high and low bit depth images. For low bit depth PNGs and JPGs, they’ll just be baked into the image data. For high bit depth EXRs, they’ll either appear in the Beauty Pass, or we can export them in their own AOV to be combined in post with the raw render.
Imager Settings Applied Before Tone Mapping
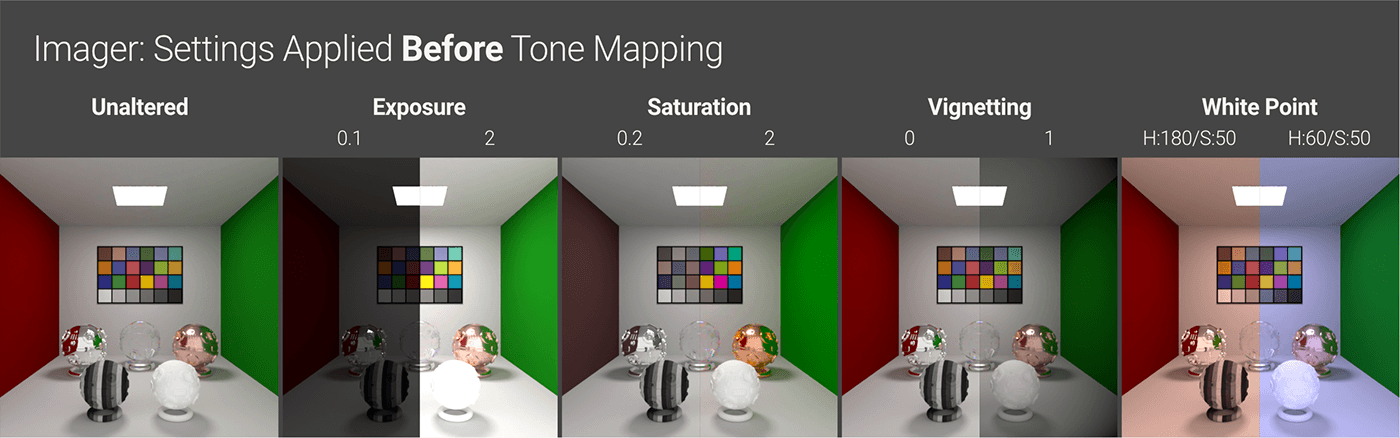
These include: Exposure, Saturation, White Point & Vignetting. They are all fairly self-explanatory if we’ve ever used an image editing app.
These affect both high and low bit depth images (PNG/JPG and EXR).
It’s difficult to see the true effects of these on high bit depth images since our displays can’t show much of the high bit depth data, so these settings are really only best used to “touch up” low bit depth PNGs and JPEGs. For EXR workflows, we should just apply Exposure/Saturation/etc. in the post app.
Important: One thing to note here is that the White Point setting is NOT the same as the White Point in the color space. It’s an additional corrective or artistic setting similar to White Balance in a photo editing app that just moves colors around to change the apparent white balance of the image. The color space’s actual white point is defined by the color space.
Settings Applied During Tone Mapping
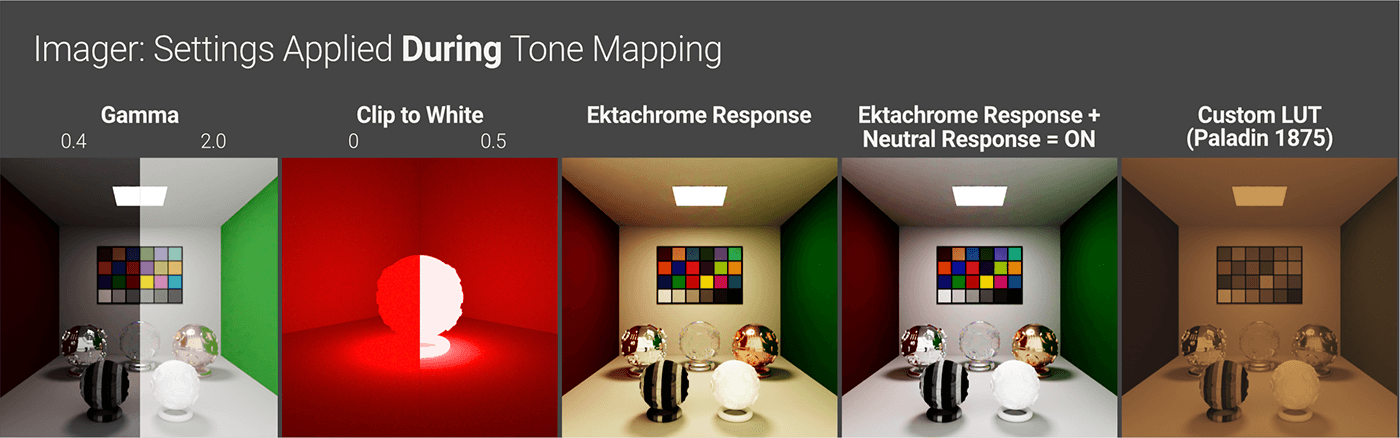
These are settings that allow us to further tweak how colors are remapped during the process of reducing high bit depth data to lower bit depth data to be used in PNGs and JPEGs. These settings ONLY apply to Octane’s default tone mapping - they are ignored if we’re using ACES, OCIO, or some other form of tone mapping.
Gamma is a true gamma curve that affects highlights and shadows - it’s independent of the transfer function. Most of the time we want to leave this at 1 (no effect), but it can be used as a makeshift basic Levels or Curves adjustment to brighten or darken the overall appearance of the image.
Clip to white affects the appearance of hot emission areas. When objects get really hot in real life, they start appearing more and more white to our eyes rather than more saturated to the color it’s set to. Standard tone mapping does not do this, but with this setting, we can make it do it :) ACES or AgX tone mapping overrides this.
The Response and Custom LUT settings apply LUTs (Look Up Tables) to the colors during the tone mapping process. This is a simple way to remap colors within the gamut to get a particular “look”, like old film stock or a sepia tone. Responses are built-in LUTs that mimic various film types - they are further broken into light/shadow curves and tinting. We can use just the light/shadow curve of any of the responses without the tinting by choosing “Neutral Response” (except sRGB or Linear).
The Custom LUT tab has a number of other LUTs built in, and a place to load our own. These are not affected by the Neutral Response checkbox.
LUTs and Responses can be combined in various ways with the Gamma setting using the Order dropdown.
Finally, these settings are mainly for low bit depth images, but they can be baked into the Beauty Pass of a high bit depth EXR file by choosing “force tone mapping”. This typically isn’t a good idea since it’s destructive (the data is tonemapped and then re-linearized, so we lose all the advantages of wide-gamut data), but if we know for sure that we want a particular look, and we can’t replicate it in post, we do have this option.
Exporting Files
Saving via the Live Viewer
This is the most direct, and “safest” way to save files since it bypasses C4D and its color management settings.
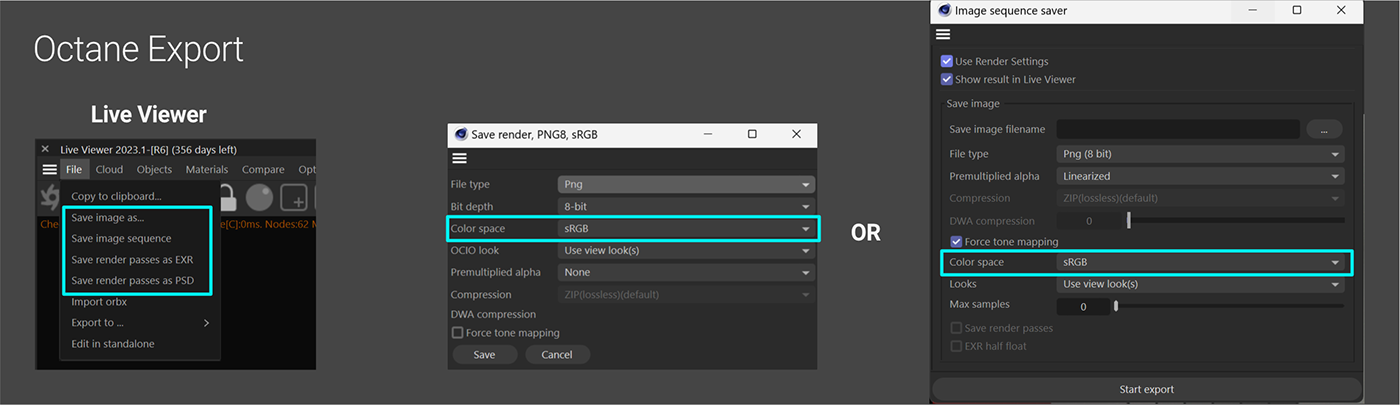
Save Image As simply exports the current frame processed through the current Imager (either global or the selected camera) as an EXR or PNG. PNGs get all of the Imager settings baked in, where EXRs get everything except tone mapping baked in (unless “force tone mapping” is checked).
Save Render Passes as EXR/PSD will export a multilayer file of the current frame with all the passes we set up in the C4D Render settings in Octane Renderer>Render AOV group.
Save Image Sequence produces a new render for every frame, and saves each frame as a new file in the sequence. Same Imager rules apply as Save Image As. Some of the settings are controlled in C4D’s Render Settings (like the frame range) if this option is selected, otherwise it will just render every frame in the scene. We have the option here of saving AOV passes for each frame as well if we’re going to EXR. We also have the option to see every frame as it renders in the Live Viewer, which is great.
Rendering to Picture Viewer
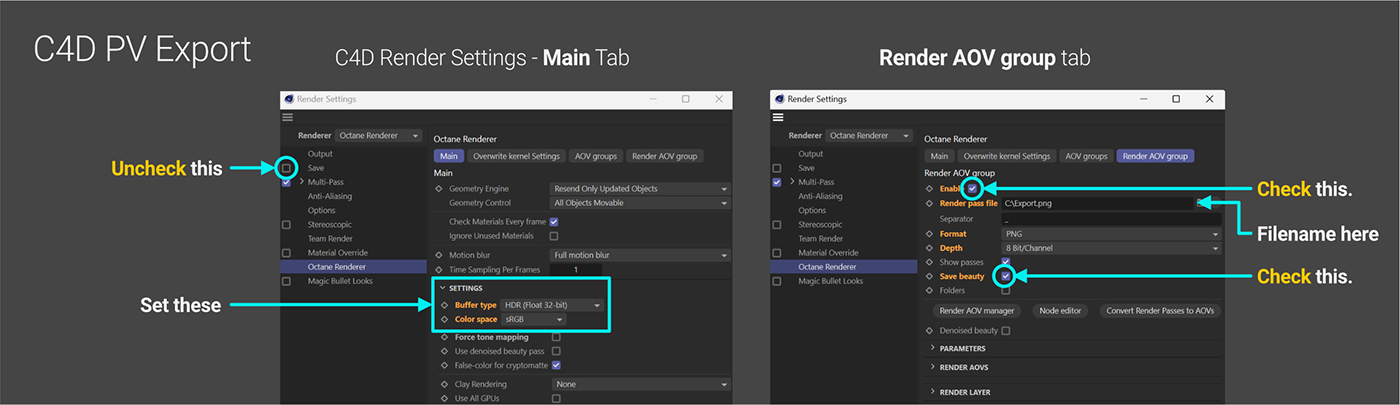
C4D Picture Viewer: It’s also still possible to use C4D’s Render to Picture Viewer function, which was originally the only way to get a final rendered sequence out. This will pull color management data from the Main tab of the C4D render settings. If we uncheck C4D’s Save option on the left hand side, we can still render frames out using the Render AOV group tab if we set our file location and check Enable and Save Beauty there.
Using C4D’s Save option (checkbox) in the render settings is a hassle to set up properly and not recommended.
Part III: Common Workflows
Linear sRGB - Default Tone Mapping
This is the default mode for Cinema 4D and Octane. The whole workflow lives in the sRGB color space, and there are no settings to change out of the box.
Advantages: Under ideal lighting, picked sRGB values are preserved pretty close to perfect when rendered. There’s no color shifting due to tone mapping (colors will obviously shift when we hit them with lights though), so the results are pretty predictable as long as we stay on the rails and don’t push the values too hard.
Drawbacks: It’s fairly easy to push colors out of the sRGB gamut with bright enough lights or shiny enough materials (even if they’re realistic), and we can easily run into issues like blown highlights or other artifacts when using default tone mapping.
Drawback Mitigation: Keep light and material values fairly low, and then finesse them in post.
Workflow:
- Picked colors are sRGB.
- External textures need to have their color space specified in the ImageTexture node that contains them.
- Octane will convert all the nonlinear values to linear and render out spectral values.
- The Live Viewer shows the default sRGB tone mapping with clipped values plus any other Imager settings that have been applied. Choosing an SDR buffer here will save a little VRAM and potentially speed the render up a tad with no difference in quality.
- 8- or 16-bit PNG/JPG exports will be in the sRGB color space (nonlinear) with default tone mapping and other Imager settings applied. They will match what we see in the Live Viewer. Choosing an SDR buffer in the Render Settings will also help a little bit here.
- 16- or 32-bit EXR exports can be in any color space (Linear sRGB by default) and will have any Imager settings applied that aren’t done during tone mapping (so yes on exposure/saturation/vignetting, no on LUTs). When these files are brought into a post app and converted to nonlinear values using the same type of tone mapping, they will match the Live Viewer in Octane.
ACES Tone Mapping

This setup is similar to the previous one, but with ACES tone mapping checked in the Imager settings.
Advantages: Much more forgiving than default sRGB tone mapping - highlights won’t tend to blow out unless the values are pushed extremely high. Realistic scenes are easier to achieve because we can just use realistic values (even out of sRGB gamut ones), and ACES’ tone mapping will preserve the intent of our renders when converting down to sRGB. Many post apps have ACES integrated now, so it’s easy to get renders looking the same from app to app.
Drawbacks: Exact color matching is extremely difficult with picked colors. ACES tone mapping will cause all the colors to shift (usually darker/more saturated) to fit all the high bit depth values into a low bit depth color space. When lights get super bright, ACES makes certain decisions about which way to move the colors, so we’ll see some shifts that we may not be expecting (reds desaturating to orange instead of pink is one of the hallmarks of ACES). This is part of what gives renders an ACES “look” (or what they may call ‘cinematic’) - depending on tastes, it may or may not be desirable.
Mitigation: This is really just about understanding what colors will do during tone mapping and altering our source colors so they look right when they come out the other end, or fixing it in post.
Workflow:
- Picked colors are sRGB.
- External textures need to have their color space specified in the ImageTexture node that contains them.
- Octane will convert all the nonlinear values to linear and render out spectral values.
- The Live Viewer shows 8-bit SDR data after ACES sRGB tone mapping has been applied, plus any other Imager settings that have not been overridden by ACES tone mapping.
- 8- or 16-bit PNG exports are encoded with the sRGB color space with ACES tone mapping applied, plus any other Imager settings.
- 16- or 32-bit EXR exports can be set to any color space, but choosing ACEScg / ACES2065-1 will make things a little easier if we are using an ACES workflow across apps. If a post app supports ACES, and the same ACES tone mapping is applied to the EXRs there, it will look the same as it does in the Live Viewer.
OCIO (AgX Example)
This setup makes use of OCIO to allow Octane to export to a wider variety of color spaces. This workflow does not change any of C4D’s settings - all the color management is done inside of Octane. In this example, we’re going to take a look at AgX which uses the Linear sRGB intermediate color space, and gives options for AgX tone mapping which has a different feel than ACES.
Advantages: Integration with other color management workflows in post apps, and the ability to pick different tone mapping options if ACES or default isn’t to our taste.
Disadvantages: Exact color matching to picked colors is extremely difficult since all colors tend to shift using any tone mapping other than default, setup is more involved.
OCIO Setup
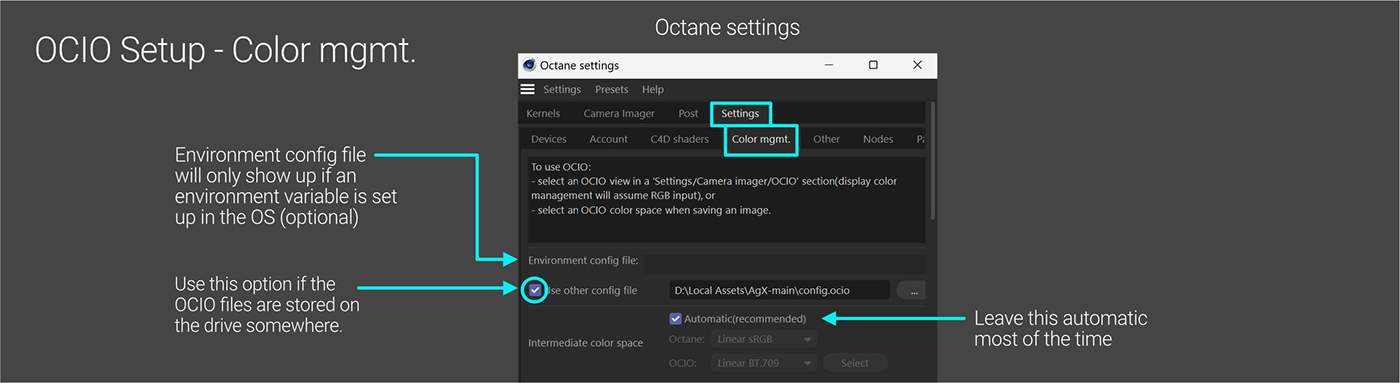
In order for Octane to use an OCIO configuration file, it needs to be set up in Octane Settings>Settings Tab>Color Mgmt.
There are two fields here. The first one is for an environment variable - this is kind of a system-wide location that all supporting apps (Octane, 3D, post, etc.) can use. It’s handy if we’re working across multiple apps and want to update them all at the same time to use the same version of our OCIO configs.
The second field - Use other config file - is probably what we’re going to do most of the time.
Important: This is a global setting for Octane, not per-project, so if we have a few different OCIO configs that we bounce back and forth between, we need to remember to set this setting each time we open a C4D file that uses OCIO.
Either way, we need to download an OCIO config file. In this guide, we’re going to use AgX, which is another popular type of tone mapping. The source files are here: https://github.com/sobotka/AgX - we just need to hit the green “code” button and download zip, then point the “Use other config file” file location field to wherever we’re storing the unzipped file.
As we now know, Octane renders out spectral values, so it needs to be aware of an OCIO color space in the config that corresponds to one of its built-in color spaces so it can properly translate the values. This is what’s known as the “intermediate color space”. Most of the time we want to leave this at automatic because Octane is really good at guessing the proper settings. We’d only want to change this to manual if we have some sort of nonstandard OCIO config and know what we’re doing. AgX’s automatic settings use the Linear sRGB-Rec709 space, (Linear sRGB and Linear BT.709/Rec.709 are the same thing).

The next thing we need to do is go to the Imager settings and into the OCIO tab.
The OCIO View is what we see after the target display color space and tone mapping is applied. The OCIO config file can contain several views that are valid depending on the hardware, but as of this writing, since the Live Viewer in Octane is 8-bit sRGB, ONLY sRGB Views will display properly REGARDLESS of the capabilities of your monitor.
The OCIO Look is similar to a LUT - it shifts the colors around to create a specific “look” or flavor to the image.
After we set this up, if we choose OCIO<> (the view will show up in the brackets if it’s set up properly), the Live viewer will show the results of the OCIO view + the OCIO look that we selected in the Imager, plus any other Imager settings that occur before tone mapping. The OCIO settings will override Response, LUTs, Gamma, ACES Tone Mapping, Highlight Compression, and Clip to White.
Depending on how the OCIO file is set up, an OCIO view may have an OCIO look incorporated into it.
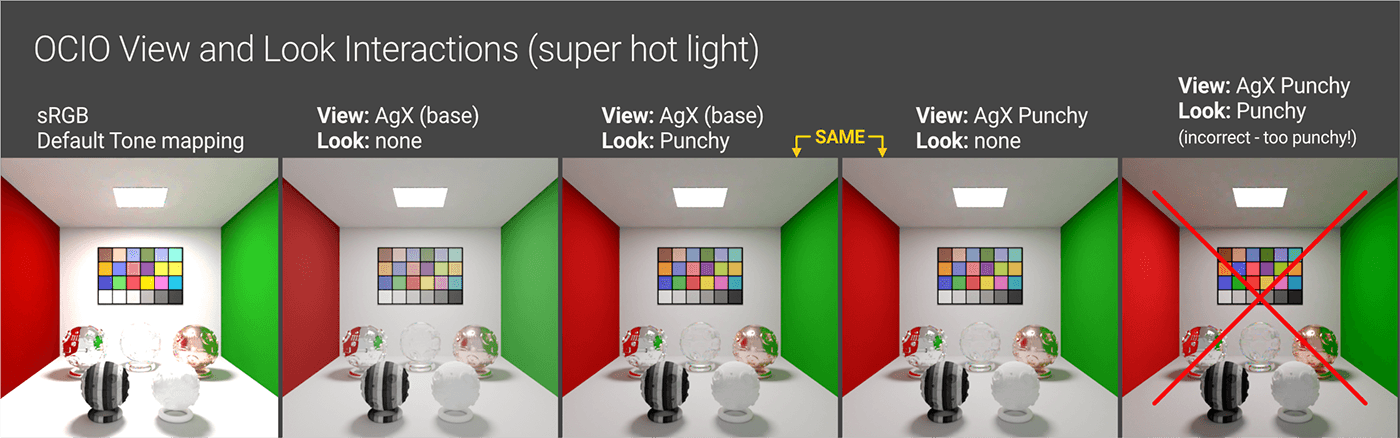
AgX (as of this writing) has three looks: Base, Punchy, and Golden. If we pick the base AgX view (just called sRGB: AgX), and set the OCIO look to either none or Use view look(s), we’ll see the result of basic AgX tone mapping. As we can see above, it handles the highlights a lot better than standard tone mapping, but the whole thing seems a little washed out and flat because of the way the values are remapped.
If we change the look to Punchy, we’ll see the image changes a bit. This still uses the base AgX view, but shifts the colors to make the image look more… punchy? It’s similar to changing some combination of the saturation and curves in post. Sometimes we want it to do this for us, other times we want to make those edits ourselves.
If we set the look back to none, and then change the view to sRGB: Appearance Punchy, we’ll see the same thing we saw when we had the look at Punchy. If we set both to Punchy, the image will appear VERY saturated.
This is set up this way to maintain compatibility with apps that don’t support looks. Octane does, so we can choose to use either the view with the integrated look, or set the view and look separately.
Exporting OCIO
When we go to do our final renders, we need to make sure that we pick the right OCIO view/color space and look in the Render Settings. Depending on how the OCIO config was coded, there could be a TON of options to hunt through.
Just like the other workflows, tone mapping is only relevant to PNG/JPEG exports. EXR exports don’t bake in the view or look unless we choose “Force Tone Mapping” (almost always a bad idea).
Modern post apps can easily convert back and forth between working color spaces, so we can export our EXRs using any color space we want and as long as the post app is aware of what that is, the result will look the same when the same OCIO profile is used to apply the AgX view and look that we were using in Octane.
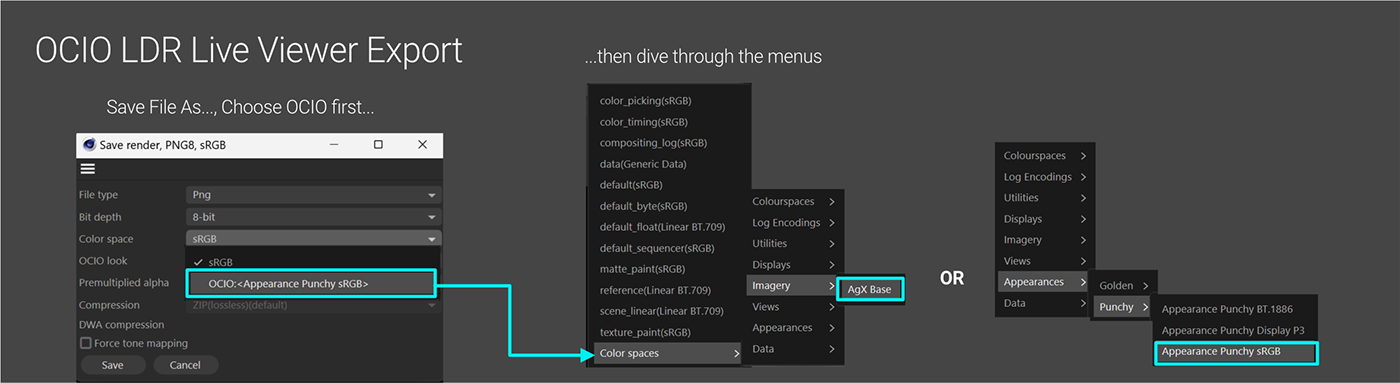
Exporting PNGs from the Live Viewer is a little fiddly. We need to first go to Color Space and choose OCIO<>. THEN, a menu will pop up and we can navigate through it to find the right OCIO view and look. For AgX, we can use Imagery>AgX for the base view+look, and Appearance>Punchy sRGB or Golden sRGB for the other two, and then just leave Look at “Use View Look”. Alternatively we can just use Imagery>AgX for the view and choose a look in the look dropdown.
Exporting via the Picture Viewer requires setting the same settings in the Main tab of the Octane Render settings, but that gives us a button for Select OCIO Color Space after we select OCIO<> rather than just popping a menu up like the Live Viewer export interface does.
Workflow:
- Picked colors are sRGB.
- External textures need to have their color space specified in the ImageTexture node that contains them.
- Octane will convert all the nonlinear values to linear and render out spectral values.
- The Live Viewer (when set to OCIO) shows 8-bit SDR data after the OCIO Look and/or View has been applied, plus any other Imager settings that have not been overridden by the OCIO tone mapping.
- 8- or 16-bit SDR PNG exports are encoded in whatever color space the OCIO config gives it (usually sRGB + view/look), plus any other Imager settings that aren’t overridden.
- 16- or 32-bit HDR EXR exports use any color space we want. If the post app supports OCIO, and the same OCIO view and look are applied to the EXR files there, it will appear the same as it does in the Live Viewer.
High bit depth linear EXR files can be encoded in several color spaces. Usually these are working spaces like Linear sRGB, ACES2065-1, ACEScg, and a few others.
High bit depth EXR files were designed to store values outside of the gamut of whatever space the data is encoded in by using negative numbers, so even though the Linear sRGB color space has the same primaries and relatively small gamut as sRGB, it can store the same data as an EXR encoded in ACES2065-1.
Modern post apps will be able to read and use all that extra data and convert to whatever working space we want there, and it won’t make any difference to the results of the tone mapped low bit depth files that get produced. There are still some editors and viewers that can’t handle negative values properly, so in that case it’d be worth exporting images in other spaces like ACES2065-1. It also makes things easier to export to one of the ACES color spaces if the whole pipeline is ACES.
Cinema 4D also has its own color space controls. If we hit Ctl (or Cmd)-D to get to Project Settings, there’s a section for Color Management (may have to roll it down). This is further divided into Basic and OCIO. Basic mode uses Linear sRGB as the working space and sRGB for any picked values. OCIO is C4D’s OCIO implementation, which is where we’ll find the native ACES settings.
As of this writing, unless there’s a VERY specific reason to change the default C4D color management settings (complex Mograph workflows that rely on passing linear gray values over to Octane materials for remapping and we don’t want to use the Color Space Converter node, for example), it’s best to leave these settings alone and do all the color management in Octane, regardless of whether we’re doing sRGB, ACES, or OCIO.
Wrap Up
Hopefully between this guide and the previous one, color management in Octane has been well and truly demystified. It takes a long time to really get your head around the whole process and the implications, but with enough practice, and referring back to these guides, it should be a lot easier than it’s ever been.
Author Notes
OG037 Color Management: Color Management in Octane, version 1.2, Last modified January 2024
Changelog:
From 1.1 Clarified language around OCIO
From 1.0 Updated wording and a few of the illustrations for clarity.
From 1.1 Clarified language around OCIO
From 1.0 Updated wording and a few of the illustrations for clarity.
This guide originally appeared on https://be.net/scottbenson and https://help.otoy.com/hc/en-us/articles/212549326-OctaneRender-for-CINEMA-4D-Cheatsheet
All rights reserved.
The written guide may be distributed freely and can be used for personal or professional training, but not modified or sold. The assets distributed within this guide are either generated specifically for this guide and released as cc0, or sourced from cc0 sites, so they may be used for any reason, personal or commercial. The emoji font used here is


